Windows 10 updates always come with goodies to improve or fix something in the performance of your PC. In some cases, though this can backfire. You can see a drop in the performance of your computer or even data loss. If you encounter any problems after you install new Windows updates, you will have to uninstall the updates. In this article, we will cover how to uninstall windows updates when necessary.
How many types of Windows updates are there?
There are two types of Windows updates: Quality Updates and Feature Updates.
The Quality updates include security patches, bug fixes, and some other small tweaks.
Feature updates are pretty big in size. They come every six months or so. They are packed with new features and big changes.
Both types of updates can be uninstalled or rolled back by various methods.
How to uninstall Windows updates?
Check recent Windows 10 or 11 updates
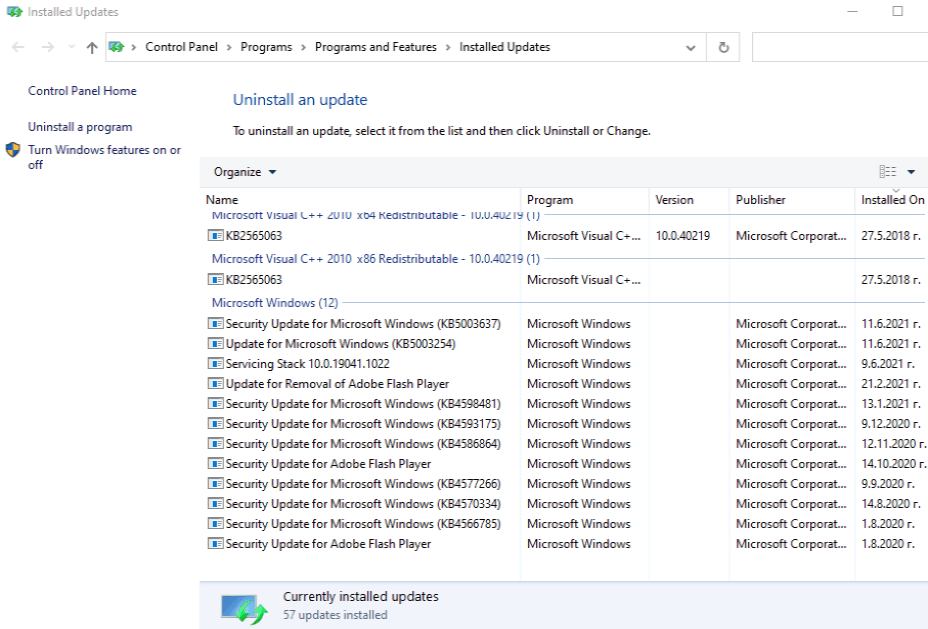
You can see your recently installed updates and you can uninstall them easily. You can do that by clicking the Start Button and click the Settings cog. When you open Settings navigate to Update & Security. From the list in the center of the windows, click “View update history”. Click “Uninstall updates” in the top-left corner.
This action will open a window with all recently installed Windows updates to your PC. By default, it will be sorted in a way, so you can see the most recent updates on the top.
How to uninstall Quality Updates?
In case some of the smaller Windows updates caused any problems, uninstalling them should be a simple process. Even if your computer is booting fine, we recommend booting into Safe Mode before proceeding with the process.
Once you follow the instructions in the previous section – Scroll down and find the Microsoft Windows section. Check the date and select the most recently installed update. At the top left of the updates table, click Uninstall. A message will pop up where you will be asked if you want to continue with the uninstallation – click Yes. Let the process finish and you will probably need to restart your system.
Note that once you uninstall an update, the system will try to install it again the next time it checks for updates. We recommend you pause your updates until you fix the problem.
How to remove Feature Updates?
Feature updates are released twice a year or so. Microsoft tests these updates on many different hardware configurations to avoid issues. They will roll out the update after your setup is deemed suitable. Still, issues can occur, so Windows offers an option to roll them back.
The one thing that you need to take into consideration here is that you can uninstall a major update within 10 days after installing it. If you see that your system is acting up and you suspect the new Windows update, make sure to act fast. After the 10 days grace period Windows automatically deletes the update files, and you can no longer rollback.
To uninstall a Feature Update, go to Settings > Update & Security > Recovery. Scroll down to Go back to the Previous Version of Windows 10. Click the Get Started button to start the uninstallation process.

Alternative: Use System Restore
As an alternative to uninstalling Windows updates, you can use Windows System Restore.
We’ve created an in-depth article on how you can roll your system back to a working state.
Uninstall updates with the command prompt
There are some cases, in which the methods mentioned above don’t work. In times like this, you can use the command prompt to force Windows 10 updates to uninstall.
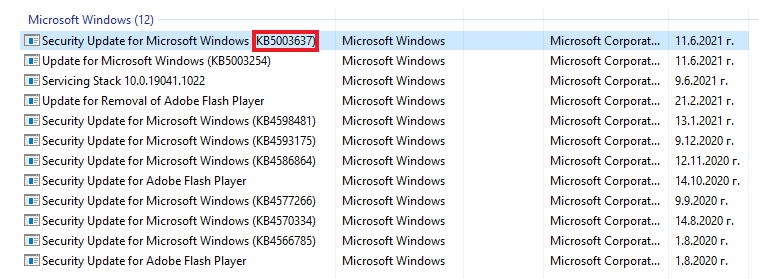
To uninstall Windows updates with the command prompt, you will need the KB-number. You can find it by going to Settings > Update & Security > In the middle of the page click “View Update history”
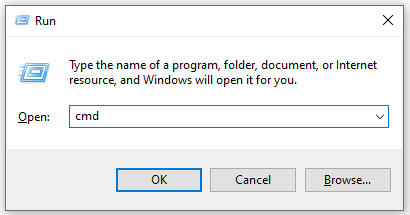
To open a command prompt, press the Windows Key + R and type “cmd”
In Windows command prompt, type: wusa/uninstall/KB: UpdateID
You need to replace UpdateID with the KB number of the update you want to remove.
After you type the command press ENTER button and follow the on-screen prompts. Let WUSA uninstall the update. It will tell you when it is complete or if any errors occur during the process. You will probably have to restart your computer, so the process can be finished.
Downgrade from Windows 11 to Windows 10
In case you upgraded recently to Windows 11 and you have some issues with the OS you can downgrade to Windows 10. Microsoft gives you 10 days to downgrade to the previous version of Windows.
If you wish to downgrade to Windows 10 do the following:
1. Open Settings
2. Click on System
3. Navigate to Recovery
4. Click on the “Go back” button
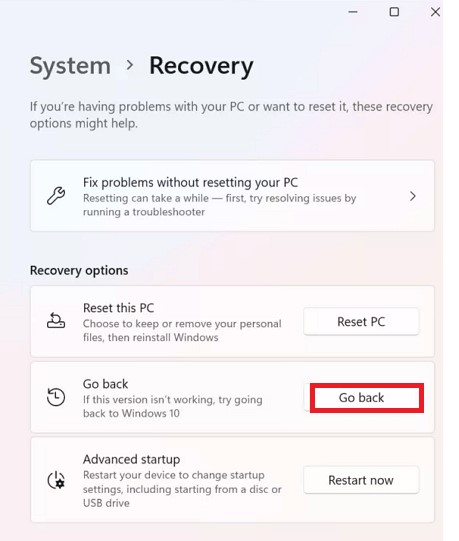
Microsoft will ask if you wish to update to the newest version of Windows 11 in case it can fix some issues. Keep following the wizard until Windows restarts and you are returned to your previous Windows version.
Your Windows does not boot after installing a new Windows update
There is a chance that, after installing an update, you can’t even boot into Windows to follow the above uninstalling instructions. Windows should automatically attempt to roll itself back, but if that fails, you have another option.

Hold the power button to turn off your PC, then turn it back on. This should bring you to the Windows recovery options. Head to Troubleshoot > Advanced Options > Uninstall Updates. This will give you the option to choose to uninstall the latest Quality Updates or the latest Feature Updates. This should recover your Windows to operate normally.
If your problems are not solved by uninstalling the latest Windows updates, that means that you have a more complex issue. We recommend that you turn to a specialist that can help you with the solution to your problem.
1 Comment
Thanks for posting such a helpful article. Some users, me included, have been having issues with update KB5005033. Now we can uninstall it to roll changes back. Cheers!